Monday 27 January 2014

Creating a Todo List using Indexed DB and Angular JS

In last post, we saw how to use Indexed DB with promise API implemented inside the browsers. In this post, we will rewrite the same sample using Angular JS. So, instead of using promise API of the browser, we will use Angular’s $q, as it makes the data binding system happy. And instead of performing the CRUD operations on Indexed DB inside a revealing module, we will do it inside a factory.

Indexed DB is available to the global scope. This means, it is a property of the window object. The best practice to use it in a factory is through the $window object, as it is injectable and makes the factory testable. Following snippet shows first few statements of the factory:

var app = angular.module('indexDBSample', []);
app.factory('indexedDBDataSvc', function($window, $q){
  var indexedDB = $window.indexedDB;
  var db=null;
  var lastIndex=0;
  ....
  ....
  ....
});


We need to add methods to open DB, get todo items, add new item and delete an item just as we did in the last post. Logic in the methods remains the same, except usage of the promise.

The open method opens the database, checks for upgrade and handles the call back if it needs. It specifies the key property of the database while creating a new database.

var open = function(){
  var deferred = $q.defer();
  var version = 1;
  var request = indexedDB.open("todoData", version);
  request.onupgradeneeded = function(e) {
    db = e.target.result;
    e.target.transaction.onerror = indexedDB.onerror;
    if(db.objectStoreNames.contains("todo")) {
      db.deleteObjectStore("todo");
    }
    var store = db.createObjectStore("todo",
      {keyPath: "id"});
  };
  request.onsuccess = function(e) {
    db = e.target.result;
    deferred.resolve();
  };
  request.onerror = function(){
    deferred.reject();
  };
  
  return deferred.promise;
};


The getTodos method fetches all available items in the DB and resolves promise with the results once all results are obtained. The fetch operation is performed using a cursor request, which returns the items individually from the indexed DB.

var getTodos = function(){
  var deferred = $q.defer();
  
  if(db === null){
    deferred.reject("IndexDB is not opened yet!");
  }
  else{
    var trans = db.transaction(["todo"], "readwrite");
    var store = trans.objectStore("todo");
    var todos = [];
  
    // Get everything in the store;
    var keyRange = IDBKeyRange.lowerBound(0);
    var cursorRequest = store.openCursor(keyRange);
  
    cursorRequest.onsuccess = function(e) {
      var result = e.target.result;
      if(result === null || result === undefined)
      {
        deferred.resolve(todos);
      }
      else{
        todos.push(result.value);
        if(result.value.id > lastIndex){
          lastIndex=result.value.id;
        }
        result.continue();
      }
    };
  
    cursorRequest.onerror = function(e){
      console.log(e.value);
      deferred.reject("Something went wrong!!!");
    };
  }
  
  return deferred.promise;
};


The addTodo method generated the next value for the key column and adds it to the Indexed DB.

var addTodo = function(todoText){
  var deferred = $q.defer();
  
  if(db === null){
    deferred.reject("IndexDB is not opened yet!");
  }
  else{
    var trans = db.transaction(["todo"], "readwrite");
    var store = trans.objectStore("todo");
    lastIndex++;
    var request = store.put({
      "id": lastIndex,
      "text": todoText
    });
  
    request.onsuccess = function(e) {
      deferred.resolve();
    };
  
    request.onerror = function(e) {
      console.log(e.value);
      deferred.reject("Todo item couldn't be added!");
    };
  }
  return deferred.promise;
};


Finally, the deleteTodo method accepts value of key property of the item to be deleted and invokes the delete method of the store to delete the item.

var deleteTodo = function(id){
  var deferred = $q.defer();
  
  if(db === null){
    deferred.reject("IndexDB is not opened yet!");
  }
  else{
    var trans = db.transaction(["todo"], "readwrite");
    var store = trans.objectStore("todo");
  
    var request = store.delete(id);
  
    request.onsuccess = function(e) {
      deferred.resolve();
    };
  
    request.onerror = function(e) {
      console.log(e.value);
      deferred.reject("Todo item couldn't be deleted");
    };
  }
  
  return deferred.promise;
};


Implementation of the controller is pretty straight forward. The controller invokes the members of the factory and updates the data items that are used to bind data on the UI.

app.controller('TodoController', function($window, indexedDBDataSvc){
  var vm = this;
  vm.todos=[];
  
  vm.refreshList = function(){
    indexedDBDataSvc.getTodos().then(function(data){
      vm.todos=data;
    }, function(err){
      $window.alert(err);
    });
  };
  
  vm.addTodo = function(){
    indexedDBDataSvc.addTodo(vm.todoText).then(function(){
      vm.refreshList();
      vm.todoText="";
    }, function(err){
      $window.alert(err);
    });
  };
  
  vm.deleteTodo = function(id){
    indexedDBDataSvc.deleteTodo(id).then(function(){
      vm.refreshList();
    }, function(err){
      $window.alert(err);
    });
  };
  
  function init(){
    indexedDBDataSvc.open().then(function(){
      vm.refreshList();
    });
  }
  
  init();
});


The complete sample is available on this plunk: http://plnkr.co/edit/7oSOUHC9hSnD8d6COkSK?p=preview

Happy coding!

Sunday 26 January 2014

Creating a Todo list using Indexed DB and Promise


What is Indexed DB

HTML5 brought lots of capabilities to the browsers including some storage APIs. One of the storage options available on browsers today is Indexed DB. As the name itself suggests, Indexed DB is much like a database, but it is meant to store JavaScript objects. Data in the Indexed DB is not relational; it just has to follow a definite structure.

The browsers support a number of APIs to help us interact with the Index DB. Details about all of the Indexed DB API can be found on the Mozilla Developer Network. Current implementation of the APIs by the browsers may not be perfect, as most of the APIs are still under development. But, the browsers have enough support now so that we can play around. Check caniuse.com to find if your browser supports Indexed DB.

As API of the Indexed DB says, all operations performed over Indexed DB are executed asynchronously. The operations don’t let the current thread processing to wait unless the operation is finished. Instead, we need to hook-up call backs to perform actions upon success or failure of the operation.

Promises in the browser

In the latest version of JavaScript, the language got built-in support for promises. This means, we don’t need to use any of the third party libraries to prettify the asynchronous code and keep it clean from nasty call backs. As Indexed DB works asynchronously, we can use promise API to make the Indexed DB operations cleaner. Very few of the browsers support the promise API as of now. Hopefully others will join the club soon.

Using the promise API is very easy. But you need to have a good understanding of what promises are before proceeding further. Following snippet shows how to use the promise API in an asynchronous function:


function operate(){
    var promise = new Promise(resolve, reject){
        if(<some condition>){
     resolve(data);
 }
 else{
     reject(error);
 }
    };
    return promise;
}


Success and failure callbacks can be hooked up to the promise object returned in the above function. Following snippet shows this:

operate().then(function(data){
    //Update UI
}, function(error){
    //Handle the error
});


Building a todo list app

Let’s start implementing a simple todo list using Indexed DB. To store the todo items in the Indexed DB, we need to create an object store. While creating, we need to specify the version of the DB and the key property. Any object inserted into the object store must contain the key property. Following code shows how to create a DB store:


var open = function(){
    var version = 1;
    var promise = new Promise(function(resolve, reject){
        //Opening the DB
        var request = indexedDB.open("todoData", version);      

        //Handling onupgradeneeded
        //Will be called if the database is new or the version is modified
        request.onupgradeneeded = function(e) {
            db = e.target.result;
            e.target.transaction.onerror = indexedDB.onerror;

            //Deleting DB if already exists
            if(db.objectStoreNames.contains("todo")) {
                db.deleteObjectStore("todo");
            }
            //Creating a new DB store with a paecified key property
            var store = db.createObjectStore("todo",
                {keyPath: "id"});
        };

        //If opening DB succeeds
        request.onsuccess = function(e) {
            db = e.target.result;
            resolve();
        };

        //If DB couldn't be opened for some reason
        request.onerror = function(e){
            reject("Couldn't open DB");
        };
    });
    return promise;
};


Now that the DB is opened, let’s extract all todo items (if exist) from it. The logic of fetching the items is conceptually similar to the way we do it with databases. Following are the steps:

  1. Open a cursor for the request to fetch items from lower bound
  2. The items will be returned one by one. Handle appropriate call back and consolidate all the values
Following code achieves this:

var getAllTodos = function() {
    var todosArr = [];

    //Creating a transaction object to perform Read/Write operations
    var trans = db.transaction(["todo"], "readwrite");
        
    //Getting a reference of the todo store
    var store = trans.objectStore("todo");

    //Wrapping all the logic inside a promise
    var promise = new Promise(function(resolve, reject){
        //Opening a cursor to fetch items from lower bound in the DB
        var keyRange = IDBKeyRange.lowerBound(0);
        var cursorRequest = store.openCursor(keyRange);

        //success callback
        cursorRequest.onsuccess = function(e) {
            var result = e.target.result;
                
            //Resolving the promise with todo items when the result id empty
            if(result === null || result === undefined){
                resolve(todosArr);
            }
            //Pushing result into the todo list 
            else{
                todosArr.push(result.value);
                if(result.value.id > lastIndex){
                    lastIndex=result.value.id;
                }
                result.continue();
            }
        };

        //Error callback
        cursorRequest.onerror = function(e){
            reject("Couldn't fetch items from the DB");
        };
    });
    return promise;
};


To add a new item to the todo list, we need to invoke the put method on the store object. As mentioned earlier, key property should be present and it should be assigned with a unique value. So, we calculate value of the next id and assign it to the object.
var addTodo = function(todoText) {
    //Creating a transaction object to perform read-write operations
    var trans = db.transaction(["todo"], "readwrite");
    var store = trans.objectStore("todo");
    lastIndex++;
        
    //Wrapping logic inside a promise
    var promise = new Promise(function(resolve, reject){
        //Sending a request to add an item
        var request = store.put({
            "id": lastIndex,
            "text": todoText
        });
            
        //success callback
        request.onsuccess = function(e) {
            resolve();
        };
            
        //error callback
        request.onerror = function(e) {
            console.log(e.value);
            reject("Couldn't add the passed item");
        };
    });
    return promise;
};


Finally, let’s delete todo item from the list. The logic remains quite similar to that of adding a new todo. The only difference is, we need just id of the item to be deleted.
var deleteTodo = function(id) {                                                                                     
    var promise = new Promise(function(resolve, reject){  
        var trans = db.transaction(["todo"], "readwrite");
        var store = trans.objectStore("todo");            
        var request = store.delete(id);                   
                                                          
        request.onsuccess = function(e) {                 
            resolve();                                    
        };                                                
                                                          
        request.onerror = function(e) {                   
            console.log(e);                               
            reject("Couldn't delete the item");           
        };                                                
    });                                                   
    return promise;                                       
};


Code of the complete sample is available at this plunk: http://plnkr.co/edit/aePFAaCucAKOXbb1qL85?p=preview

Happy coding!

Tuesday 21 January 2014

SideWaffle and my Contribution to the Project

What is SideWaffle?

SideWaffle is a community driven project that adds new project templates, item templates and code snippets to Visual Studio 2012 and 2013. It is a Visual Studio extension, can be installed from extension manager on both Visual Studio 2012 and 2013. If you are a .NET developer and use Visual Studio for development (which is obvious :)), install this extension before proceeding further.

The project is started by a set of folks including some working at Microsoft web tools team and some of the respectable technology experts. But the project is open sourced on Github and accepts contributions from any community member. If you ever wanted to see some templates of your own choice in the dialog boxed of Visual Studio, but were not sure of how to do it (like myself), now SideWaffle provides you a way to create the template very easily and also share it with all the developers around the globe.

A glance at some of the templates and snippets

SideWaffle already includes a bunch of useful templates and snippets. Following are some of the item templates available. As you see, we have a set of handy templates available to create just what we used to from scratch using the default language-based templates in Visual Studio.


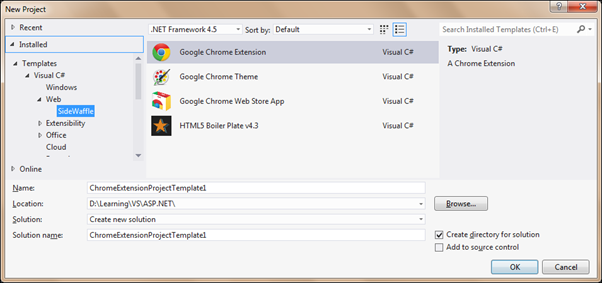
You can also create non-.NET projects like Chrome extension using a project template made available with SideWaffle.


My contribution

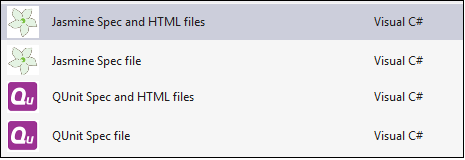
Over the past few days, I have been unit testing some Angular JS code. Creating the test spec files from scratch every time was not something I enjoyed. So, I wanted to see templates in the Add -> New Item dialog box of Visual Studio that creates a basic test skeleton on top of which I can write my tests. In the past, I have used Jasmine and QUnit for unit testing JavaScript code. So, I thought of contributing the templates to SiddeWaffle as testing JavaScript is becoming very popular these days. I forked the SideWaffle project on Github and my job of writing templates became easy with help of the video tutorial put up by Sayed on Youtube. I created the following four templates:

1. Jasmine Spec and HTML files: Adds a sample Jasmine spec file and the Jasmine HTML runner file 2. Jasmine Spec file: Adds a sample Jasmine spec file 3. QUnit Spec and HTML files: Adds a sample QUnit spec file and the QUnit HTML runner file 4. QUnit Spec file: Adds a sample QUnit spec file

I sent a pull request with the above templates and my changes were merged into the project. Now, I can’t wait to see my own templates under the SideWaffle tab:


You can do it too!

I have put together this blog post to let you know people like you and I can create our own template and share it with the entire community. Creating own item template in Visual Studio is painful, but SideWaffle’s build system makes this process very easy. Have a template that you want to share with everyone? Put it here!

Tuesday 7 January 2014

Using Dependency Injection with ASP.NET Web API Hosted on Katana

Using Katana we can build a light-weight server to host an ASP.NET application, without needing IIS or System.Web. Katana has a nice support for hosting SignalR and Web API with very few lines of code. In a previous post, we saw how to self-host SignalR using Katana. In this post, we will see how easy it is to perform dependency injection on a self-hosted Katana application.

Open Visual Studio 2013 and create a new console application. Add following NuGet packages to the application:


  • Install-Package Microsoft.AspNet.WebApi.Owin
  • Install-Package Ninject


First package gets a bunch of packages for creating and hosting Web API. The second package installs the Ninject IoC container.

Add an API Controller to the application and change the code of the controller to:

public class ProductsController : ApiController
{
    IProductsRepository repository;

    public ProductsController(IProductsRepository _repository)
    {
        repository = _repository;
    }

    public IEnumerable<Product> Get() 
    {
        return repository.GetAllProducts();
    }
}

We need to inject instance of a concrete implementation of IProductRepository. We will do this using dependency injection. You can create the repository interface and an implementation class by your own.

To perform dependency injection with Web API, the WebApiContrib project has a set of NuGet packages, including one for Ninject. But the version of Web API it requires is 4.0.30319. As we are using VS 2013, the default version of Web API is 5.0.0.0. Installing this NuGet package may result into version compatibility issues. To avoid this issue, we can build the WebapiContrib.Ioc.Ninject project using VS 2013 or we can also copy the code of NinjectResolver class from the GitHub repo and add it to the console application.

In the Owin Startup class, we need to configure Web API and also tie it with an instance of NinjectResolver. Constructor of NinjectResolver accepts an argument of IKernel type. Kernel is the object where we define the mapping between requested types and types to be returned. Let’s create a class with a static method; this method will create the kernel for us. Add a class and name it NinjectConfig. Change code of the class as:

public static class NinjectConfig
{
    public static IKernel CreateKernel()
    {
        var kernel = new StandardKernel();

        try
        {
            kernel.Bind<IProductsRepository>().To<ProductRepository>();
            return kernel;
        }
        catch (Exception)
        {
            throw;
        }
    }
}

Now all we need to do is, configure Web API and start the server. Add a class, change the name as Startup and replace the code as:
public class Startup
{
    public void Configuration(IAppBuilder app)
    {
        var config = new HttpConfiguration();
        config.DependencyResolver = new NinjectResolver(NinjectConfig.CreateKernel());

        config.Routes.MapHttpRoute("default", "api/{controller}/{id}", new { id=RouteParameter.Optional });

        app.UseWebApi(config);
    }
}


Finally, start the server in Main method:
static void Main(string[] args)
{
    string uri = "http://localhost:8080/";

    using (WebApp.Start<Startup>(uri))
    {
        Console.WriteLine("Server started...");
        Console.ReadKey();
        Console.WriteLine("Server stopped!");
    }
}


Open a browser and enter the following URL:


http://localhost:8080/api/products


You should be able to see list of products returned from the repository class.

Happy coding!