Thursday 25 December 2014

Automating Tasks in Front-end Web Apps Using Gulp

As we started writing a lot of JavaScript and CSS these days, front-end development has matured like anything. We create hundreds of JavaScript source files to make our code organized; but finally we need to ship just one JavaScript file and one CSS file while deploying the application. This conversion is not easy; as it involves several steps like running tests, validating against jshint, concatenating, minifying, uglifying and many other tasks. Thankfully, we have a number of automated task runners and a handful of plugins on each of these task runners to make these tasks easier.

Out of the existing task runners, Grunt and Gulp are most widely used. I use Grunt a lot these days. Though I haven’t blogged about it, I used it in some of my SitePoint articles. Lately, Gulp is becoming more famous. Gulp uses a different approach to address the same problem that Grunt addresses. Let’s see how we can leverage Gulp to automate our tasks.

Gulp is a task runner based on Node.js. It uses streams to carry its tasks. The way Gulp works is, it accepts a source (can be a file, or a set of files), processes them based on a task and passes it to the next task in the pipe for further processing. The pipes continues processing till the last task. Following is the syntax of a typical Gulp task:

gulp.task('task-name', function () {
  return gulp.src([source paths])
    .pipe(task1(parameters))
    .pipe(task2())
    ...
    ...
    ...
    .pipe(taskn())
    .pipe(gulp.dest('destination-path'));
});

Tasks piped in the above Gulp task are tasks loaded using Gulp plugins. Gulp has a huge number of plugins contributed and actively developed by community, which makes it a very good ecosystem. To be able to use Gulp in your project, you need to have it installed globally and locally. Run the following commands in a command prompt to get Gulp installed:

  • npm installed –g gulp
  • npm installed gulp --save-dev (To be ran in your project folder)


Let’s write a Gulp task for cleaning distribution files and regenerating them after concatenating and minifying. For this, we need the following Gulp plugins:

  • gulp-clean
  • gulp-concat
  • gulp-uglify


These can be installed using the following nom commands:
  • npm install gulp-clean --save-dev
  • npm install gulp-concat --save-dev
  • npm install gulp-uglify --save-dev


Add a file to the project and rename it to Gulpfile.js. Load the Gulp tasks in this file:


var gulp = require('gulp'),
    concat = require('gulp-concat'),
    uglify = require('gulp-uglify'),
    clean = require('gulp-clean');


Before generating the files to be deployed, let’s clean the folder. Following task does this:

gulp.task('clean', function () {
    return gulp.src(['dist'])
        .pipe(clean());
});


Now, let’s create a bundle task that concatenates all JS files, uglifies them and copies inside a folder to be distributed. Following is the task:

gulp.task('bundle', function () {
  return gulp.src(['public/src/*.js'])
    .pipe(concat('dist/combined.js'))
    .pipe(uglify())
    .pipe(gulp.dest('.'));
});


The folder public/src contains all JS files of the application. They are concatenated into one file and the contents are then uglified and finally we call the dest task to copy the resultant file to destination, which is the dist folder.

These two tasks can be combined into one task as follows:


gulp.task('createDist', ['clean', 'bundle']);


Now, if you run the following command, you will have the combined.js file created inside dist folder.

gulp createDist

To make a task default, name of the task has to be default.


gulp.task('default', ['clean', 'bundle']);


To run this task, you can run gulp command without passing names of any tasks to it.

We will see explore more features of Gulp in future posts.

Happy coding!

Monday 27 October 2014

Form Validation and Displaying Error Messages using ngMessages in AngularJS 1.3

AngularJS 1.3 was released around two weeks back. As the core Angular team says, it is the best AngularJS released till date. It comes with a bunch of new features and performance improvements.

One of the key changes in this release is the changes made to forms. The directives form and ngModel went through a number of changes to make it easier to perform validation. The framework has a new module, ngMessages that makes the job of displaying validation messages easier.

In the current release, FormController have following additional APIs:

  • $setUntouched(): A method that sets all controls in the form to untouched. It is good to call this method along with $setPristine()
  • $setSubmitted(): A method that sets the state of the form to submitted
  • $submitted: A boolean property that indicates if the form is submitted

NgModelController has the following additional APIs:

  • $setUntouched(): A method that sets the control to untouched state
  • $setTouched(): A method that sets the control to touched state
  • $validators: A list of synchronous validators that are executed when $validate method is called
  • $asyncValidators: A list of asynchronous validators that are executed when $validate method is called
  • $validate(): A method that executes all validators applied on the control. It calls all synchronous validators followed by asynchronous validators
  • $touched: Boolean property that indicates if the control is touched. It is automatically set to true as soon as cursor moves into the control
  • $untouched: Boolean property that indicates if the control is untouched

For more details on these APIs, read the official API documentation of FormController and NgModelController.

Let’s see these APIs and the new featured in action. Consider the following form:


<form name='vm.inputForm' ng-submit='vm.saveNewItem()' novalidate>
  Item Name: <input name='itemName' type="text" ng-model='vm.newItem.name' required non-existing-name />
  <br />
  Min Price: <input name='minPrice' type="text" ng-model='vm.newItem.minPrice' required ng-pattern='vm.numberPattern' />
  <br />
  Max Price: <input name='maxPrice' type="text" ng-model='vm.newItem.maxPrice' required ng-pattern='vm.numberPattern' greater-than='vm.newItem.minPrice' />
  <br />
  Quantity Arrived: <input name='quantity' type="text" ng-model='vm.newItem.quantity' ng-pattern='vm.numberPattern' />
  <br />

  <input type="submit" value="Save Item" />
</form>

Note: Notice name of the form in the above snippet. It is not the way we usually name the HTML elements. We assigned a property of an object instead of a plain string name. Reason for using this is to make the form available in the controller instance. This approach is very useful in case of controllerAs syntax. (Credits: Josh Caroll’s blog post)

The form has some built-in validation and two custom validations. Built-in validations work the same way as they used to in the earlier versions ( Refer to my old blog post that talks a lot about the validations). We will write the custom validations in a minute.

Following is the controller of the page. As stated above, I am using “controller as” syntax, so no $scope in the controller.


var app = angular.module('formDemoApp', ['ngMessages']);

app.controller('SampleCtrl', function(){
  var vm = this;

  vm.inputForm = {};

  vm.numberPattern = /^\d*$/;

  vm.saveNewItem = function(){
    vm.newItem={};
    vm.inputForm.$setPristine();
    vm.inputForm.$setUntouched();
  };
});

Custom Synchronous Validations

The process of defining custom validations has been simplified in AngularJS 1.3 with $validators and $asyncValidators. We don’t need to deal anymore with $setValidity() to set validity of the control.

In case of synchronous validations, we need to return a boolean value from the validator function. The validation is passed when result of the validator function is true; otherwise, it fails.

In the form, we are accepting min price and max price values. The form should validate that the value of min price is always less than value of max price. Following is the directive for this validation:


app.directive('greaterThan', function(){
  return {
    restrict:'A',
    scope:{
      greaterThanNumber:'=greaterThan'
    },
    require: 'ngModel',
    link: function(scope, elem, attrs, ngModelCtrl){
      ngModelCtrl.$validators.greaterThan= function(value){
          return parseInt(value) >= parseInt(scope.greaterThanNumber);
      };

      scope.$watch('greaterThanNumber', function(){
        ngModelCtrl.$validate();
      });
    }
  };
});

If the above validation fails, it sets invalid flag to greaterThan validation on the control. Name of the method set to $validators is used as the validator string.

Custom Asynchronous Validations

In some scenarios, we may have to query a REST API to check for validity of data. As AJAX calls happen asynchronously, the validator function has to deal with promises to perform the task.

For the demo, I created a dummy asynchronous method inside a factory that checks for existence of the new item name in a static array and resolves a promise with a boolean value. Following is the service:


app.factory('itemsDataSvc', ['$q',function($q){
  var itemNames=['Soap', 'Shampoo', 'Perfume', 'Nail Cutter'];

  var factory={};

  factory.itemNameExists=function(name){
    var nameExists = false;
    itemNames.forEach(function(itemName){
      if(itemName === name){
        nameExists=true;
      }
    });
    return $q.when(nameExists);
  };

  return factory;
}]);

The difference between synchronous and asynchronous validators is the API used to resister the validator and the return value of the validator method. As already stated, $asyncValidators of NgModelController is used to register the validator and the validator method has to return a promise. The validation passes when promise is resolved and the validation fails if the promise is rejected.

Following is the custom asynchronous validator that checks for unique name:


app.directive('nonExistingName', ['itemsDataSvc','$q',function(itemsDataSvc, $q){
  return {
    restrict:'A',
    require:'ngModel',
    link: function(scope, elem, attrs, ngModelCtrl){
      ngModelCtrl.$asyncValidators.nonExistingName = function(value){
        var deferred = $q.defer();

        itemsDataSvc.itemNameExists(value).then(function(result){
          if(result){
            deferred.reject();
          }
          else{
            deferred.resolve();
          }
        });

        return deferred.promise;
      };
    }
  };
}]);

Validation Error Messages using ngMessages

Displaying validation messages of the form in AngularJS had not been too good earlier. It used to take a lot of mark-up and conditions to make them look user-friendly. AngularJS 1.3 has a new module, ngMessages that simplifies this task. If you refer to the module definition statement in the controller script, it has a dependency on ngMessages module. This module doesn’t come by default as part of the core framework, we have a separate file for this module.

The ngMessage module contains two directives that help in showing messages:

  • ngMessages: Shows or hides messages out of a list of messages
  • ngMessage: Shows or hides a single message

The directives in ngMessages module support animations as well. I will cover that in a future post.

In case of displaying form validation messages, ngMessages is set to the $error property of the form object and every occurrence of ngMessage element is set to the condition for which the message is has to be displayed.


<div ng-if='vm.inputForm.$dirty &amp;&amp; vm.inputForm.$invalid' ng-messages='vm.inputForm.$error' class='error-messages'>
  <div ng-message='required'>One/more mandatory fields are missing values</div>
  <div ng-message='pattern'>Data is in incorrect format</div>
  <div ng-message='greaterThan'>Invalid range</div>
  <div ng-message='nonExistingName'>Name already exists</div>
</div>

By default, ngMessages displays the first message out of the list even if more than one message is relevant. It can b overridden using multiple or ng-messages-multiple attribute on the ngMessages directive.

The above message list is generic to the form; the messages are not specific to any of the control in the form. To display messages specific to form, you can use the $error property on the form element.


<div ng-if='vm.inputForm.itemName.$dirty' ng-messages='vm.inputForm.itemName.$error' class='error-messages'>
  <div ng-message='required'>One/more mandatory fields are missing values</div>
  <div ng-message='nonExistingName'>Name already exists</div>
</div>

You can play with the sample on Plnkr.

Happy coding!

Sunday 28 September 2014

Unit Testing Config and Run Blocks in AngularJS

One of the best-selling points of AngularJS framework is testability. Any piece of code written in an AngularJS application is testable unless it is corrupted by a global object.

All of the blocks in AngularJS except config and run blocks can be instantiated or invoked and tested. Config and run blocks are executed as soon as the module containing the block is loaded into memory. There is no way to call them manually; unless the bodies of these blocks are defined independently and then hooked to a module. But, they are invoked automatically when the module is loaded. So, I don’t see a need to invoke them manually to test their logic.

Say, we have the following module with a config block registering routes and a run block that listens to a global message event to the window:


var app = angular.module('testApp',['ngRoute']);

app.config(function($routeProvider){
  $routeProvider.when('/', {templateUrl:'templates/home.html',controller:'homeCtrl'})
    //definitions of other routes
    .otherwise({redirectTo:'/'});
});

app.run(function($window, $rootScope){
  $window.addEventListener('message', function(event){
    $rootScope.$broadcast(event.data);
  });
});


In test of the config block, we need to see if the methods when and otherwise are called with right parameters. To do that, we must spy these methods and store a reference of $routeProvider as soon as the module in loaded in tests. Providers cannot be mocked using $provide like services as they are not available after config phase. We can pass a callback to module loader and create spies on the methods whose calls have to be inspected.

Following snippet shows how to spy on a provider’s method and a test that checks if the method is called:


describe('testing config block', function() {
  var mockRouteProvider;

  beforeEach(function () {
    module('ngRoute', function ($routeProvider) {
      mockRouteProvider = $routeProvider;
      spyOn(mockRouteProvider, 'when').andCallThrough();
      spyOn(mockRouteProvider, 'otherwise').andCallThrough();
    });
    module('testApp');
  });

  it('should have registered a route for \'/\'', function(){
    expect(mockRouteProvider.when).toHaveBeenCalled();
  });
});


If you run the above test now, it should fail. That’s strange, isn’t it?

I spent a lot of time struggling with it and found two approaches to make the above test pass.

One approach is to have a dummy test before the test that performs an assertion on the logic of config block. You can leave this test empty as it doesn’t have to do anything, or have an assertion that would always pass.


it('doesn\'t have any assertions', function(){});


I didn’t like this approach; as it adds a test that would always pass and doesn’t carry any value. The other approach to make the above test pass is by calling inject() inside a beforeEach block. The inject function is generally used to get references of services that are needed in the tests. Even if there is no need of any service in the tests, the inject block can be called without any callback to bootstrap the modules already loaded using module() blocks.

beforeEach(function(){
  inject();
});


You will see the same issue with run() block as well. It isn’t executed unless a test is executed or inject block is executed.

If you got a better approach to bootstrap modules in tests, feel free to post a comment.

Happy coding!

Saturday 6 September 2014

Serializing and De-serializing JSON data Using ServiceStack

ServiceStack is a light-weight, complete and independent open source web framework for .NET. I recently started playing with it and I must say that it is an awesome framework. It has several nice features including .NET’s fastest JSON serializer.

Each piece in ServiceStack can be used independently. So is its piece for serialization. The serialization package of ServiceStack can be installed via NuGet using the following command:


The above package can be installed on any type of application. Let’s use the following Person class for creating object to serialize/de-serialize:

public class Person
{
    public int Id { get; set; }
    public string Name { get; set; }
    public string City { get; set; }
    public string Occupation { get; set; }
}


Following is a sample object of the person class:

var person = new Person()
{
    Id = 1,
    Name = "Ravi",
    City = "Hyderabad",
    Occupation = "Software Engineer"
};


To serialize this object to a JSON string, we need to use the ServiceStack.Text.JsonSerializer class. Following statement serializes the above object:

var serialized = JsonSerializer.SerializeToString(person);


The above string can be de-serialized using the following statement:

var converted = JsonSerializer.DeserializeFromString<Person>(serialized);


The JsonSerializer class also has APIs to serialize into or de-serialize from TextWriter or Stream.

The APIs in ServiceStack are light-weight and easy to use. I am working on a series of articles on this great framework. Stay tuned for updates.

Happy coding!

Friday 27 June 2014

Using Promises in NodeJS Apps

To separate logic of accessing data from the routes, we create separate modules to handle the task of data access. When I started learning Node.js, a common pattern that I saw in some samples to separate the data access logic from routing was as follows:

//Route
app.get(‘/api/students’, getAllStudents);

//In data access file
exports.getStudents = function(request, response){
  mongoDbObj.students.find().toArray(function(err, data){
    if(err){
      console.log(err); 
      response.send(500,{error: err});
    }
    else{
      console.log(data);
      response.send(data);
    }
  });
};


Though this approach separates the logic, we are dealing with request and response inside the data access logic. I am personally not a fan of this approach. But, we cannot return the data or error from the above function as we will get them asynchronously. This is where I started thinking of using promises to refactor the above function.

We have several promise libraries available for Node.js. These days, I am playing with Bluebird. It can be installed using npm.

One of the nice features that bluebird provides is, promisifying existing methods. To turn operations defined by an object into asynchronous, we need to pass the object inside the promisifyAll() method.


var Promise=require('bluebird');
var mongodb=Promise.promisifyAll(require('mongodb')); 


The above snippet creates asynchronous versions of each of the function created inside the object mongodb. Let’s convert some of the snippets from my previous post to use async. Code for establishing a connection to MongoDB changes to:

mongoClient.connectAsync('mongodb://localhost/studentsDb')    
           .then(function(db){
              console.log("Connected to MongoDB");
              mongoDbObj={
                db:db,
                students:  db.collection('students')
              };
            }, function(error){
                console.log(error);
            });


Let’s fetch details of all students and return the results asynchronously to the caller. On the result of calling find() method, we need to call the asynchronous method toArray() to convert data from documents to array. It makes sense to return a promise in such scenario as we can’t say when the result will be available. Following is the snippet for fetching data that returns a promise:

exports.getAllStudentsAsync=function(){
  return new Promise(function(resolve, reject){
    mongoDbObj.students.find()
              .toArray(function(err, result){
                 if(err)
                 {
                   reject(err);
                 }
                 else{
                   resolve(result);
                 }
            });
    });
};


Finally, the REST API that sends the student data to the browser changes to:

app.get('/api/students, function(request, response){
  mongoOps.getAllStudentsAsync()
          .then(function(data){
            response.send(data);
          }, function(err){
            response.send(500,{error: err});
          });
});


To me, this seems to be a cleaner approach as the request and response are sent to the model for manipulation. Feel free to express your opinions in the comments.

Happy coding!

Monday 23 June 2014

Performing CRUD Operations on MongoDB in Node.js Application Using mongodb Driver

A NoSQL database is the go-to choice while writing applications using Node.js. In particular, MongoDB has got a lot of popularity in the community. Thanks to the awesome MEAN (MongoDB-Express-Angular-Node) stack, that makes everyone realize that an entire web app can be written using just one language (JavaScript).

There are a number of drivers created by the community to interact with MongoDB from a Node.js app. The official mongodb driver seems to be the simplest of them. Because, the JavaScript API it provides to interact with MongoDB is quite similar to the way one talks to MongoDB from console. In this post, we will learn to perform simple CRUD operations on a MongoDB document store using the mongodb driver.

We will be dealing with a set of students that is initially loaded with the following data:


{
 "studentId" : 1,
 "class" : 8, 
 "name" : "Ravi", 
 "marks" : [
  { "totalMarks" : 500, "percent" : 83.3 },
  { "totalMarks" : 510, "percent" : 85 } ], 
},
{ 
 "studentId" : 2,
 "name" : "Rupa", 
 "class" : 8, 
 "marks" : [
  { "totalMarks" : 570, "percent" : 95 },
  { "totalMarks" : 576, "percent" : 96 } ] 
}


To be able to work with the above data, we need to establish a connection with MongoDB first. Before that, we need to get the driver installed in the current project. Following command will install the driver when it is ran in the folder where the target Node.js project is located:

npm install mongodb

I prefer placing the code interacting with MongoDB in a separate file. As first thing, we need to get a reference to the MongoDB client and establish a connection:


var mongoClient=require('mongodb').MongoClient;
var mongoDbObj;

mongoClient.connect('mongodb://localhost/studentDb', function(err, db){
  if(err)
    console.log(err);
  else{
    console.log("Connected to MongoDB");
    mongoDbObj={db: db,
      students: db.collection('students')
    };
}


Retrieving values:

In the above connection URL, studentDb is name of the database. If the database doesn’t already exists, it is created automatically. I cached the students collection in the mongoDbObj object to avoid calling collections() over and over. Following statement fetches all students from the database:

mongoDbObj.students.find().toArray(function(err, data){
  if(err){
    console.log(err);
  else{
    //operate with the deta
  }
});


The find() method returns the objects in the form of documents. We need to convert the data obtained to a JavaScript array to operate with it easily. This is done by the toArray method.

Following are some examples showing using find with conditions:

mongoDbObj.students.find({studentId:1})    //Fetches the student with value of studentId 1
mongoDbObj.students.find({studentId:{$gte:2}})    //Fetches the student with value of studentId greater than or equal to 2
mongoDbObj.students.find({"marks.totalMarks":500})    //Fetches the student with at least one of the values of totalMarks 500
mongoDbObj.students.find({"marks.totalMarks":{$lte:500}})    //Fetches the student with at least one of the values of totalMarks less than or equal to 500


Inserting data:

Inserting data is a straight forward operation. It needs the object to be inserted, an optional options object and a callback to handle the success or failure.


mongoDbObj.students.insert(newStudent,{w:1},function(err, result){
  if(err){
    //Handle the failure case
  }
  else{
    //Handle the success case 
  }
});


The value of options object passed in above call to insert method is used to get acknowledgement of write operations.

Updating data:

Following statement replaces the matched object:

mongoDbObj.students.update({studentId:1},{name:”Ravi Kiran”},{w:1}, function(err, result){
    //Handle success and failure
});


The issue with the above approach is, as it does a full replace, there is a possibility of losing data of other fields in the matched record. Following statement updates the specified fields leaving unspecified fields untouched:

mongoDbObj.students.update({studentId:1},{$set: {name:”Ravi Kiran”}},{w:1}, function(err, result){
  //Handle success and failure
});


Deleting data:

Calling remove() method without any conditions deletes all records in a collection:


mongoDbObj.students.remove(function(err, result){
    //Handle success and failure
});


If a condition is passed in, it deletes the records that match the criteria:

mongoDbObj.students.remove({studentId:studentId},{w:1},function(err, result){
    //Handle success and failure
});
We will discuss more about MongoDB and Node.js in future posts.

Happy Coding!

Sunday 8 June 2014

Expanding my Writing Zone

I started this blog as a novice blogger less than 2 years back and I had an amazing writing experience till now. I just can’t say enough about the accolades I received from the readers of this blog and also some constructive criticism that helped me in writing better. Thanks to each one of you that are reading this blog. I will continue writing good content here. In addition to writing for my blog, I started writing content for two of leading content publishers on the internet.

DotNet Curry Magazine:
DotNet Curry Magazine (DNC Magazine) is a free magazine for .NET developers around the world. It is started and ran by a set of technology experts including Suprotim Agarwal, a Microsoft MVP for ASP.NET/IIS. Suprotim is the Editor-in-chief for the magazine. The magazine releases an issue on every alternate month with high quality content on latest Microsoft Technologies. I am one of the thousands of subscribers to the magazine and I highly recommend subscribing to the magazine. The authors are MVPs and experts around the world. I am fortunate to have joined the team of authors. My first article for DNC was published during the May 2014 edition of the magazine and the article is now available on their website too, you can check it here. Stay tuned for lots of .NET content on DNC Magazine from all the authors.


Check my author page on DotNetCurry site: http://www.dotnetcurry.com/author.aspx?AuthorName=Ravi%20Kiran

Site Point:
Sitepoint is a very well-known site for many developers as a source of knowledge on several topics including HTML, CSS, JavaScript, Mobile, UX, Design and other topics. They publish articles, books, courses and also have forums for Q&A. I read several of their articles focussed on front-end web technologies. I contacted Sitepoint to know I could write for them and the editor-in-chief Ophelie Lechat accepted me as an author for their site. As most of you would have already guessed, I will be posting articles focused on JavaScript for Sitepoint. My first article for Sitepoint is published, you can read it here. Also check articles by other authors, they will help you for sure. I have a nice set of articles planned to be published for Sitepoint. Follow their twitter feed for tweets on their articles and also for technology news.

Check my author page on SitePoint: http://www.sitepoint.com/author/rkiran/

I was busy in initiating my work for these writing assignments and writing articles. So, I couldn't get enough time to blog. But, I have a nice series planned for this blog and you will see the posts popping up soon.

Happy coding!

Thursday 8 May 2014

Building a Todo list application using Node.js and Express.js on Visual Studio

Some of you might have surprised to see the title containing Node, Express and Visual Studio together. Yes, it is possible to build Node.js applications on Visual Studio. In case, if you don’t know Visual Studio also has an extension for developing Python applications, you need to install the PTVS (Python Tools for Visual Studio) to be able to do it. The team that developed on PTVS also developed NTVS (Node.js Tools for Visual Studio) with help from a couple of community folks. NTVS is open source right from the beginning and accepts community contributions. The project is still in beta, so it has some pain points, but still it works pretty well. To follow along with this post, download and install the extension from its codeplex site. It works with the 2012 and 2013 versions of Visual Studio.

After installing NTVS, fire up Visual Studio and choose File -> New -> Project. In the dialog, expand Other Languages, and the node JavaScript under that. You will see a new option Node.js added here. Under this, you will find a number of project templates to start developing Node.js applications.


If you have TypeScript installed, you will find the same set of templates under TypeScript node as well.

Let us start building a simple Todo list application using NTVS. From the new project dialog, select Blank Express Application, change name of the application to Express-Todo and hit OK.

The new project we just created has all the set up ready for developing a Node – Express application. The project has the following NPM packages installed; you can find them under the npm node in Solution Explorer.


Express is a light weight server framework to develop Node.js applications. Jade is the most popular view engine used with express to compose the pages. Stylus defines a way to write CSS, takes many pain points of writing CSS away.

The app.js file generated with the project template has a number of middle-wares invoked for us to set up the node application.


app.set('port', process.env.PORT || 3000);  //Port number configured for the application
app.set('views', path.join(__dirname, 'views'));  //Folder under which the view files are stored
app.set('view engine', 'jade');  //Configuring view engine so that express parses them before rendering
app.use(express.favicon());  //Invoking favicon on startup
app.use(express.logger('dev')); 
app.use(express.json());
app.use(express.urlencoded());
app.use(express.methodOverride());
app.use(app.router);
app.use(require('stylus').middleware(path.join(__dirname, 'public')));  //Stylus middleware invocation
app.use(express.static(path.join(__dirname, 'public')));  //Defining relative path for static files


Now run the application. You should be able to see a simple hello World kind of view in the browser.

We need another NPM package, underscore.js. It can be installed in two ways. One is using the dialog offered by NTVS or using npm command on the command prompt. Let us use the GUI dialog to install the package. Right click on the NPM node and choose “Manage npm Modules…”. Go to the tab “Search npm Repository” and type underscore. Choose the package highlighted in the screenshot and hit Install Locally. This step adds the package to the project and adds an entry of underscore to package.json as well.


Check the contents under npm node, you should be able to see the package underscore there.

Add a new JavaScript file to the folder routes and name it todos.js. This file will contain the API service to display and add todo items against an in-memory collection. Following is the code in the file:


var _ = require('underscore');

var listItems =
[
    {
        "id": 1,
        "text": "Get Up"
    },
    {
        "id": 2,
        "text": "Brush teeth"
    },
    {
        "id": 3,
        "text": "Get Milk"
    },
    {
        "id": 4,
        "text": "Prepare coffee"
    },
    {
        "id": 5,
        "text": "Have a hot cup of coffee"
    }
];

exports.list = function(req, res){    
    res.send(listItems);
};

exports.addToList = function (req, res) {
    var maxId = _.max(listItems, function (item) { return item.id });
    console.log(maxId);
    var newTodoItem = { "id": maxId.id + 1, "text": req.body.text };
    listItems.push(newTodoItem);
    res.send({ success: true, item: newTodoItem });
};


I used underscore to calculate the next ID of the todo item. To use underscore, we need to add the require declaration at the beginning of the file, it is similar to the using statements in C# code files. All members to be exposed to the outside world have to be added to the exports object.

In order to expose the above methods as APIs, we need to define the HTTP method and attach a route path to them. In the app.js file add the following statement at the top:

var todos = require('./routes/todos');


This statement brings the module object exposed by the todos.js file. Now all we need to do is define routes, they are done as follows:


app.get('/api/todos', todos.list);
app.post('/api/todos', todos.addToList);


That’s pretty easy, isn’t it? With this, we are done with the work on the server side. Let’s define the components on the client side. As first thing, let’s add jQuery to the layout page. You can install the package using bower and use it or you can point to a CDN as well. Let’s use Google’s CDN path to refer jQuery. Following is the jade tag that does this:


script(src="http://ajax.googleapis.com/ajax/libs/jquery/2.1.0/jquery.min.js")


Now, let’s update the index.jade file to contain the list items. Following is the mark-up of the modified index.jade file:

extends layout

block content
  h1= title
  p Welcome to #{title}
  ul(id="todoList")
  br
  br
  input(type="text" id="txtNewTodo")
  button(id="btnAddTodo") Add New Todo
  script(src="/javascripts/todoOperations.js")


As you see, in jade, one doesn’t require angle brackets to define the tags. It understands nesting through indentation. For indenting the tags, one can use either spaces or tabs; but not both. We are yet to define the todoOperations.js file referred above. Let’s do it now. Add a JavaScript file to the javascripts folder under public folder and name it todoOperations.js. Code in this file is pretty straight forward, if you know jQuery.

var todoOperations = function () {
    var todos;

    function getAllTodos() {
        //var deferred=$.defer();

        return $.get("/api/todos", function (data) {
            todos = data;
        });
    }

    function addTodo(todoItem) {
        return $.post('/api/todos', todoItem);
    }

    return {
        getAllTodos: getAllTodos,
        addTodo: addTodo
    }
}();

var list;

function refreshTodos() {
    todoOperations.getAllTodos().then(function (data) {
        $.each(data, function () {
            list.append("<li data-id='" + this.id + "'>" + this.text + "</li>");
        });
    });
}

$(function () {
    list = $("#todoList");

    $("#btnAddTodo").click(function () {
        var textBox = $("#txtNewTodo");
        if (textBox.val() !== "") {
            todoOperations.addTodo({ "text": textBox.val() }).then(function (data) {
                if (data.success === true) {
                    list.append("<li data-id='" + data.item.id + "'>" + data.item.text + "</li>");
                    textBox.val('');
                }
            });
        }
    });

    refreshTodos();
});


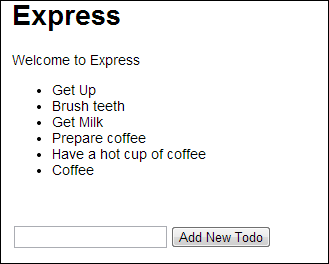
Now run the application. You will be able to see the list of todo items populated on the page and you will also be able to add new todo items. 
 
To update and delete the todo items, you need to define the methods in the todos,js file and add routes for them in the app.js file using app.put and app.delete methods. I am leaving it as an exercise for you :)

Happy coding!

Thursday 17 April 2014

$parsers and $formatters in Custom Validation Directives in Angular JS

While writing applications using Angular JS, sometimes we need to define our own validators. Custom validations in Angular JS are created as directives with a dependency on the ng-model directive. At times, key part of the validation depends on controller of the ng-model directive.

The ng-model directive provides two arrays of functions to which the custom validation logic can be hooked: $parsers and $formatters. Usage of both of these arrays looks similar, but they are invoked under different conditions.

$parsers:
In most of the cases, $parsers is the right option to handle the logic of custom validation. Functions added to $parsers are called as soon as the value in the form input is modified by the user. As an example, consider the following directive:


app.directive('evenNumber', function(){
  return{
    require:'ngModel',
    link: function(scope, elem, attrs, ctrl){
      ctrl.$parsers.unshift(checkForEven);
      
      function checkForEven(viewValue){
        if (parseInt(viewValue)%2 === 0) {
          ctrl.$setValidity('evenNumber',true);
        }
        else{
          ctrl.$setValidity('evenNumber', false);
        }
        return viewValue;
      }
    }
  };
  
});


This is a simple directive that checks if the number entered in the textbox is even. If we apply validation on a textbox, the validator works as long as the value is modified in the textbox.

$formatters:
Formatters are invoked when the model is modified in the code. They are not invoked if the value is modified in the textbox. $formatters are useful when there is a possibility of the value getting modified from the code. $formatters can be applied in the above directive using a simple statement:


ctrl.$formatters.unshift(checkForEven);


Now, the validation on the textbox containing the evenNumber is fired when the value is directly modified or even when the value is modified in the code.

A demo of the directive is available on plnkr.

Happy coding!

Sunday 30 March 2014

Basics: Benefits of Writing Unit Tests

Quite often people ask the reasons of writing unit tests for their code. There are several benefits of writing unit tests that add value to the code as well as the developers writing the tests. I am listing a set of points here that came to my mind while thinking about the benefits of Unit testing.

Benefits to code:
  • The code will have very few bugs as most of them are identified and resolved while running tests
  • Silly mistakes are inevitable while writing code. Identifying them while running the application is difficult at times. Unit tests catch them instantly
  • Code doesn’t need documentation. Names of the behaviours or methods defined in unit tests shout the purpose of their part
  • Testable code is easily extensible too. Adding new features to the code becomes easy
  • If Unit tests are written right from beginning of development, the underlying code automatically follows a set of quality measures that are otherwise very difficult to achieve
  • After applying some modifications, the code can be shipped within very less amount of time, as most of the regression testing is also done by the unit tests


Benefits to Programmers:
  • Unit testing teaches good programing practices to developers
  • Unit tests force programmers to use some of the features of the language and framework that would otherwise remain just as theories in programmers’ minds
  • As we write more code, our thinking about code starts maturing. With unit tests, we are bound to write a lot of additional code than the usual production code. So, it improves the programmer’s ability to think logically
  • Programmers gain the experience of writing clean, loosely coupled code and learn the ways to avoid anti-patterns
  • It becomes very easy for any new member to understand and start working on the code


These are just my opinions. The list is definitely not limited to the above set of points. Feel free to put a comment on anything that I didn’t mention in the above list.

Happy coding!

Sunday 9 March 2014

A Closer Look at the Identity Client Implementation in SPA Template

Sometime back, we took a look at the identity system in ASP.NET and its support for both local and remote accounts. In this post, we will take a closer look at the way it is used in the Single Page Application template that comes with Visual Studio 2013.

The SPA application is a JavaScript client that uses an authenticated Web API. The Web API exposes a number of API methods to manage users. The JavaScript code uses jQuery for AJAX and Knockout for data binding has a number of methods that accomplish the task of managing the user. Let’s take a look at how the local users are authenticated.

Identity Client Implementation for Local Users:
If you check the Web API’s authentication configuration class, it exposes an endpoint at /Token for serving authorization token. Login credentials of the user have to be posted to this URL to get the user logged in. In response, the endpoint sends some data of which access token is a component. The access token has to be saved and used for subsequent requests to indicate the session of the logged in user.

Following code in the app.datamodel.js file sends a post request to the ‘/Token’ endpoint to login the user:


self.login = function (data) {
    return $.ajax(loginUrl, {
        type: "POST",
        data: data
    });
};

Following is the snippet from login.viewmodel.js that calls the above method:
dataModel.login({
    grant_type: "password",
    username: self.userName(),
    password: self.password()
}).done(function (data) {
    self.loggingIn(false);

    if (data.userName && data.access_token) {
        app.navigateToLoggedIn(data.userName, data.access_token, self.rememberMe());
    } else {
        self.errors.push("An unknown error occurred.");
    }
});


There are a couple of things to be noticed in the above code:

  • The property grant_type has to be set in the data passed to the login method
  • The navigateToLoggedIn method stores the access token in browser’s local storage to make it available for later use

To sign up for a new user, we just need to post the user’s data to the endpoint at ”/api/Account/Register”. Once the user is successfully registered, it sends a login request to the token endpoint discussed above to login the user immediately. Code for this can be found in the register method of register.viewmodel.js file. Following is the snippet that deals with registering and logging in:


dataModel.register({
    userName: self.userName(),
    password: self.password(),
    confirmPassword: self.confirmPassword()
}).done(function (data) {
    dataModel.login({
        grant_type: "password",
        username: self.userName(),
        password: self.password()
    })
    ......


Identity Client Implementation for External Login Users:
Identity implementation for external accounts is a bit tricky; because it involves moving the scope to a public web site and a number of API calls. When the application loads, it gets the list of external login providers by sending an HTTP GET request to “/api/Account/ExternalLogins”. Following method in app.datamodel.js does this:


self.getExternalLogins = function (returnUrl, generateState) {
    return $.ajax(externalLoginsUrl(returnUrl, generateState), {
        cache: false,
        headers: getSecurityHeaders()
    });
};

The parameter returnUrl used in the above method is where the user would be redirected after logging in from the external site.

Based on the providers obtained from the server, the provider specific login buttons are shown on the page. When a user chooses to use an external login provider, the system redirects him to the login page of the chosen provider. Before redirecting, the script saves the state and the URL redirected in session storage and local storage (both are used to make it work on most of the browsers). This information will be used once the user comes back to the site after logging in. Following snippet in login.viewmodel.js does this:


self.login = function () {
    sessionStorage["state"] = data.state;
    sessionStorage["loginUrl"] = data.url;
    // IE doesn't reliably persist sessionStorage when navigating to another URL. Move sessionStorage temporarily
    // to localStorage to work around this problem.
    app.archiveSessionStorageToLocalStorage();
    window.location = data.url;
};


Once the user is successfully authenticated by the external provider, the external provider redirects the user to the return URL with an authorization token in the query string. This token is unique for every user and the provider. This token is used to check if the user has already been registered to the site. If not, he would be asked to do so. Take a look at the following snippet from the initialize method in app.viewmodel.js:
......       
 } else if (typeof (fragment.access_token) !== "undefined") {
    cleanUpLocation();
    dataModel.getUserInfo(fragment.access_token)
    .done(function (data) {
    if (typeof (data.userName) !== "undefined" && typeof (data.hasRegistered) !== "undefined"
            && typeof (data.loginProvider) !== "undefined") {
        if (data.hasRegistered) {
            self.navigateToLoggedIn(data.userName, fragment.access_token, false);
        }
        else if (typeof (sessionStorage["loginUrl"]) !== "undefined") {
            loginUrl = sessionStorage["loginUrl"];
            sessionStorage.removeItem("loginUrl");
            self.navigateToRegisterExternal(data.userName, data.loginProvider, fragment.access_token,                              loginUrl, fragment.state);
        }
        else {
            self.navigateToLogin();
        }
    } else {
        self.navigateToLogin();
    }
})
......


It does the following:

  • Clears the access token from the URL
  • Queries the endpoint ‘/api/UserInfo’ with the access token for information about the user
  • If the user is found in the database, it navigates to the authorized content
  • Otherwise, navigates to the external user registration screen, where it asks for a local name

The external register page accepts a name of user’s choice and posts it to ‘/api/RegisterExternal’. After saving the user data, the system redirects the user to login page with value of state set in the session and local storages and also sends the authorization token with the URL. The login page uses this authorization token to identify the user.


dataModel.registerExternal(self.externalAccessToken, {
        userName: self.userName()
    }).done(function (data) {
        sessionStorage["state"] = self.state;
        // IE doesn't reliably persist sessionStorage when navigating to another URL. Move sessionStorage
        // temporarily to localStorage to work around this problem.
        app.archiveSessionStorageToLocalStorage();
        window.location = self.loginUrl;
    })


For logout, an HTTP POST request is sent to ‘/api/Logout’. It revokes the claims identity that was associated with the user. The client code removes entry of the access token stored in the local storage.

Happy coding!

Monday 17 February 2014

Consuming ASP.NET Web API OData Batch Update From JavaScript

Consuming OData with plain JavaScript is a bit painful, as we would require handling some of the low-level conversions. datajs is a JavaScript library that simplifies this task.

datajs converts data of any format that it receives from the server to an easily readable format. The batch request sent is a POST request to the path /odata/$batch, which is made available if batch update option is enabled in the OData route configuration.

As seen in the last post, a batch update request bundles of a number of create put and patch requests. These operations have to be specified in an object literal. Following snippet demonstrates it with a create, an update and a patch request:


var requestData = {
    __batchRequests: [{
        __changeRequests: [
            {
                requestUri: "/odata/Customers(1)",
                method: "PATCH",
                data: {
                    Name: "S Ravi Kiran"
                }
            },
            {
                requestUri: "/odata/Customers(2)"
                data: {
                    Name: "Alex Moore",
                    Department: "Marketing",
                    City:"Atlanta"
                }
            },
            {
                requestUri: "/odata/Customers",
                method: "POST",
                data: {
                    Name: "Henry",
                    Department: "IT",
                    City: "Las Vegas"
                }
            }
        ]
    }]
};

Following snippet posts the above data to the /odata/$batch endpoint and then extracts the status of response of each request:

OData.request({
    requestUri: "/odata/$batch",
    method: "POST",
    data: requestData,
    headers: { "Accept": "application/atom+xml"}
}, function (data) {
    for (var i = 0; i < data.__batchResponses.length; i++) {
        var batchResponse = data.__batchResponses[i];
        for (var j = 0; j < batchResponse.__changeResponses.length; j++) {
            var changeResponse = batchResponse.__changeResponses[j];
        }
    }
    alert(window.JSON.stringify(data));
}, function (error) {
    alert(error.message);
}, OData.batchHandler);


Happy coding!

Sunday 16 February 2014

Batch Update Support in ASP.NET Web API OData

The ASP.NET Web API 2 OData includes some new features including the support for batch update. This features allows us to send a single request to the OData endpoint with a bunch of changes made to the entities and ask the service to persist them in one go instead of sending individual request for each change made by the user. This reduces the number of round-trips between the client and the service.

To enable this option, we need to pass an additional parameter to the MapODataRoute method along with other routing details we discussed in an older post. Following statement shows this:


GlobalConfiguration.Configuration.Routes.MapODataRoute("ODataRoute", "odata", model,new DefaultODataBatchHandler(GlobalConfiguration.DefaultServer));


I have a CustomerController that extends EntitySetController and exposes OData API to perform CRUD and patch operations on the entity Customer, which is stored in a SQL Server database and accessed using Entity Framework. Following is code of the controller:

public class CustomersController : EntitySetController<Customer, int>
{
    CSContactEntities context;

    public CustomersController()
    {
        context = new CSContactEntities();
    }

    [Queryable]
    public override IQueryable<Customer> Get()
    {
        return context.Customers.AsQueryable();
    }

    protected override int GetKey(Customer entity)
    {
        return entity.Id;
    }

    protected override Customer GetEntityByKey(int key)
    {
        return context.Customers.FirstOrDefault(c => c.Id == key);
    }

    protected override Customer CreateEntity(Customer entity)
    {
        try
        {
            context.Customers.Add(entity);
            context.SaveChanges();
        }
        catch (Exception)
        {
            throw new InvalidOperationException("Something went wrong");
        }

        return entity;
    }

    protected override Customer UpdateEntity(int key, Customer update)
    {
        try
        {
            update.Id = key;
            context.Customers.Attach(update);
            context.Entry(update).State = System.Data.Entity.EntityState.Modified;

            context.SaveChanges();
        }
        catch (Exception)
        {
            throw new InvalidOperationException("Something went wrong");
        }

        return update;
    }

    protected override Customer PatchEntity(int key, Delta<Customer> patch)
    {
        try
        {
            var customer = context.Customers.FirstOrDefault(c => c.Id == key);

            if (customer == null)
                throw new InvalidOperationException(string.Format("Customer with ID {0} doesn't exist", key));

            patch.Patch(customer);
            context.SaveChanges();
            return customer;
        }
        catch (InvalidOperationException ex)
        {
            throw ex;
        }
        catch (Exception)
        {
            throw new Exception("Something went wrong");
        }
    }

    public override void Delete(int key)
    {
        try
        {
            var customer = context.Customers.FirstOrDefault(c => c.Id == key);

            if (customer == null)
                throw new InvalidOperationException(string.Format("Customer with ID {0} doesn't exist", key));

            context.Customers.Remove(customer);
            context.SaveChanges();
        }
        catch (InvalidOperationException ex)
        {
            throw ex;
        }
        catch (Exception)
        {
            throw new Exception("Something went wrong");
        }
    }
}


Let’s use the batch update feature in a .NET client application. Let’s try adding a new customer and update an existing customer in the Customers table. Following code does this:

Container container = new Container(new Uri("http://localhost:<port-no>/odata"));

var firstCustomer = container.Customers.Where(c => c.Id == 1).First();
firstCustomer.Name = "Ravi Kiran";
container.UpdateObject(firstCustomer);

var newCustomer = new Customer() { Name="Harini", City="Hyderabad", Department="IT"};
container.AddToCustomers(newCustomer);

var resp = container.SaveChanges(SaveChangesOptions.Batch);


The last statement in the above snippet sends a batch request containing two requests: one to add a new customer and one to update an existing customer. The update operation calls the patch operation exposed by the OData API.

In next post, we will see how to perform batch update in a JavaScript client.

Happy coding!

Monday 27 January 2014

Creating a Todo List using Indexed DB and Angular JS

In last post, we saw how to use Indexed DB with promise API implemented inside the browsers. In this post, we will rewrite the same sample using Angular JS. So, instead of using promise API of the browser, we will use Angular’s $q, as it makes the data binding system happy. And instead of performing the CRUD operations on Indexed DB inside a revealing module, we will do it inside a factory.

Indexed DB is available to the global scope. This means, it is a property of the window object. The best practice to use it in a factory is through the $window object, as it is injectable and makes the factory testable. Following snippet shows first few statements of the factory:

var app = angular.module('indexDBSample', []);
app.factory('indexedDBDataSvc', function($window, $q){
  var indexedDB = $window.indexedDB;
  var db=null;
  var lastIndex=0;
  ....
  ....
  ....
});


We need to add methods to open DB, get todo items, add new item and delete an item just as we did in the last post. Logic in the methods remains the same, except usage of the promise.

The open method opens the database, checks for upgrade and handles the call back if it needs. It specifies the key property of the database while creating a new database.

var open = function(){
  var deferred = $q.defer();
  var version = 1;
  var request = indexedDB.open("todoData", version);
  request.onupgradeneeded = function(e) {
    db = e.target.result;
    e.target.transaction.onerror = indexedDB.onerror;
    if(db.objectStoreNames.contains("todo")) {
      db.deleteObjectStore("todo");
    }
    var store = db.createObjectStore("todo",
      {keyPath: "id"});
  };
  request.onsuccess = function(e) {
    db = e.target.result;
    deferred.resolve();
  };
  request.onerror = function(){
    deferred.reject();
  };
  
  return deferred.promise;
};


The getTodos method fetches all available items in the DB and resolves promise with the results once all results are obtained. The fetch operation is performed using a cursor request, which returns the items individually from the indexed DB.

var getTodos = function(){
  var deferred = $q.defer();
  
  if(db === null){
    deferred.reject("IndexDB is not opened yet!");
  }
  else{
    var trans = db.transaction(["todo"], "readwrite");
    var store = trans.objectStore("todo");
    var todos = [];
  
    // Get everything in the store;
    var keyRange = IDBKeyRange.lowerBound(0);
    var cursorRequest = store.openCursor(keyRange);
  
    cursorRequest.onsuccess = function(e) {
      var result = e.target.result;
      if(result === null || result === undefined)
      {
        deferred.resolve(todos);
      }
      else{
        todos.push(result.value);
        if(result.value.id > lastIndex){
          lastIndex=result.value.id;
        }
        result.continue();
      }
    };
  
    cursorRequest.onerror = function(e){
      console.log(e.value);
      deferred.reject("Something went wrong!!!");
    };
  }
  
  return deferred.promise;
};


The addTodo method generated the next value for the key column and adds it to the Indexed DB.

var addTodo = function(todoText){
  var deferred = $q.defer();
  
  if(db === null){
    deferred.reject("IndexDB is not opened yet!");
  }
  else{
    var trans = db.transaction(["todo"], "readwrite");
    var store = trans.objectStore("todo");
    lastIndex++;
    var request = store.put({
      "id": lastIndex,
      "text": todoText
    });
  
    request.onsuccess = function(e) {
      deferred.resolve();
    };
  
    request.onerror = function(e) {
      console.log(e.value);
      deferred.reject("Todo item couldn't be added!");
    };
  }
  return deferred.promise;
};


Finally, the deleteTodo method accepts value of key property of the item to be deleted and invokes the delete method of the store to delete the item.

var deleteTodo = function(id){
  var deferred = $q.defer();
  
  if(db === null){
    deferred.reject("IndexDB is not opened yet!");
  }
  else{
    var trans = db.transaction(["todo"], "readwrite");
    var store = trans.objectStore("todo");
  
    var request = store.delete(id);
  
    request.onsuccess = function(e) {
      deferred.resolve();
    };
  
    request.onerror = function(e) {
      console.log(e.value);
      deferred.reject("Todo item couldn't be deleted");
    };
  }
  
  return deferred.promise;
};


Implementation of the controller is pretty straight forward. The controller invokes the members of the factory and updates the data items that are used to bind data on the UI.

app.controller('TodoController', function($window, indexedDBDataSvc){
  var vm = this;
  vm.todos=[];
  
  vm.refreshList = function(){
    indexedDBDataSvc.getTodos().then(function(data){
      vm.todos=data;
    }, function(err){
      $window.alert(err);
    });
  };
  
  vm.addTodo = function(){
    indexedDBDataSvc.addTodo(vm.todoText).then(function(){
      vm.refreshList();
      vm.todoText="";
    }, function(err){
      $window.alert(err);
    });
  };
  
  vm.deleteTodo = function(id){
    indexedDBDataSvc.deleteTodo(id).then(function(){
      vm.refreshList();
    }, function(err){
      $window.alert(err);
    });
  };
  
  function init(){
    indexedDBDataSvc.open().then(function(){
      vm.refreshList();
    });
  }
  
  init();
});


The complete sample is available on this plunk: http://plnkr.co/edit/7oSOUHC9hSnD8d6COkSK?p=preview

Happy coding!

Sunday 26 January 2014

Creating a Todo list using Indexed DB and Promise


What is Indexed DB

HTML5 brought lots of capabilities to the browsers including some storage APIs. One of the storage options available on browsers today is Indexed DB. As the name itself suggests, Indexed DB is much like a database, but it is meant to store JavaScript objects. Data in the Indexed DB is not relational; it just has to follow a definite structure.

The browsers support a number of APIs to help us interact with the Index DB. Details about all of the Indexed DB API can be found on the Mozilla Developer Network. Current implementation of the APIs by the browsers may not be perfect, as most of the APIs are still under development. But, the browsers have enough support now so that we can play around. Check caniuse.com to find if your browser supports Indexed DB.

As API of the Indexed DB says, all operations performed over Indexed DB are executed asynchronously. The operations don’t let the current thread processing to wait unless the operation is finished. Instead, we need to hook-up call backs to perform actions upon success or failure of the operation.

Promises in the browser

In the latest version of JavaScript, the language got built-in support for promises. This means, we don’t need to use any of the third party libraries to prettify the asynchronous code and keep it clean from nasty call backs. As Indexed DB works asynchronously, we can use promise API to make the Indexed DB operations cleaner. Very few of the browsers support the promise API as of now. Hopefully others will join the club soon.

Using the promise API is very easy. But you need to have a good understanding of what promises are before proceeding further. Following snippet shows how to use the promise API in an asynchronous function:


function operate(){
    var promise = new Promise(resolve, reject){
        if(<some condition>){
     resolve(data);
 }
 else{
     reject(error);
 }
    };
    return promise;
}


Success and failure callbacks can be hooked up to the promise object returned in the above function. Following snippet shows this:

operate().then(function(data){
    //Update UI
}, function(error){
    //Handle the error
});


Building a todo list app

Let’s start implementing a simple todo list using Indexed DB. To store the todo items in the Indexed DB, we need to create an object store. While creating, we need to specify the version of the DB and the key property. Any object inserted into the object store must contain the key property. Following code shows how to create a DB store:


var open = function(){
    var version = 1;
    var promise = new Promise(function(resolve, reject){
        //Opening the DB
        var request = indexedDB.open("todoData", version);      

        //Handling onupgradeneeded
        //Will be called if the database is new or the version is modified
        request.onupgradeneeded = function(e) {
            db = e.target.result;
            e.target.transaction.onerror = indexedDB.onerror;

            //Deleting DB if already exists
            if(db.objectStoreNames.contains("todo")) {
                db.deleteObjectStore("todo");
            }
            //Creating a new DB store with a paecified key property
            var store = db.createObjectStore("todo",
                {keyPath: "id"});
        };

        //If opening DB succeeds
        request.onsuccess = function(e) {
            db = e.target.result;
            resolve();
        };

        //If DB couldn't be opened for some reason
        request.onerror = function(e){
            reject("Couldn't open DB");
        };
    });
    return promise;
};


Now that the DB is opened, let’s extract all todo items (if exist) from it. The logic of fetching the items is conceptually similar to the way we do it with databases. Following are the steps:

  1. Open a cursor for the request to fetch items from lower bound
  2. The items will be returned one by one. Handle appropriate call back and consolidate all the values
Following code achieves this:

var getAllTodos = function() {
    var todosArr = [];

    //Creating a transaction object to perform Read/Write operations
    var trans = db.transaction(["todo"], "readwrite");
        
    //Getting a reference of the todo store
    var store = trans.objectStore("todo");

    //Wrapping all the logic inside a promise
    var promise = new Promise(function(resolve, reject){
        //Opening a cursor to fetch items from lower bound in the DB
        var keyRange = IDBKeyRange.lowerBound(0);
        var cursorRequest = store.openCursor(keyRange);

        //success callback
        cursorRequest.onsuccess = function(e) {
            var result = e.target.result;
                
            //Resolving the promise with todo items when the result id empty
            if(result === null || result === undefined){
                resolve(todosArr);
            }
            //Pushing result into the todo list 
            else{
                todosArr.push(result.value);
                if(result.value.id > lastIndex){
                    lastIndex=result.value.id;
                }
                result.continue();
            }
        };

        //Error callback
        cursorRequest.onerror = function(e){
            reject("Couldn't fetch items from the DB");
        };
    });
    return promise;
};


To add a new item to the todo list, we need to invoke the put method on the store object. As mentioned earlier, key property should be present and it should be assigned with a unique value. So, we calculate value of the next id and assign it to the object.
var addTodo = function(todoText) {
    //Creating a transaction object to perform read-write operations
    var trans = db.transaction(["todo"], "readwrite");
    var store = trans.objectStore("todo");
    lastIndex++;
        
    //Wrapping logic inside a promise
    var promise = new Promise(function(resolve, reject){
        //Sending a request to add an item
        var request = store.put({
            "id": lastIndex,
            "text": todoText
        });
            
        //success callback
        request.onsuccess = function(e) {
            resolve();
        };
            
        //error callback
        request.onerror = function(e) {
            console.log(e.value);
            reject("Couldn't add the passed item");
        };
    });
    return promise;
};


Finally, let’s delete todo item from the list. The logic remains quite similar to that of adding a new todo. The only difference is, we need just id of the item to be deleted.
var deleteTodo = function(id) {                                                                                     
    var promise = new Promise(function(resolve, reject){  
        var trans = db.transaction(["todo"], "readwrite");
        var store = trans.objectStore("todo");            
        var request = store.delete(id);                   
                                                          
        request.onsuccess = function(e) {                 
            resolve();                                    
        };                                                
                                                          
        request.onerror = function(e) {                   
            console.log(e);                               
            reject("Couldn't delete the item");           
        };                                                
    });                                                   
    return promise;                                       
};


Code of the complete sample is available at this plunk: http://plnkr.co/edit/aePFAaCucAKOXbb1qL85?p=preview

Happy coding!

Tuesday 21 January 2014

SideWaffle and my Contribution to the Project

What is SideWaffle?

SideWaffle is a community driven project that adds new project templates, item templates and code snippets to Visual Studio 2012 and 2013. It is a Visual Studio extension, can be installed from extension manager on both Visual Studio 2012 and 2013. If you are a .NET developer and use Visual Studio for development (which is obvious :)), install this extension before proceeding further.

The project is started by a set of folks including some working at Microsoft web tools team and some of the respectable technology experts. But the project is open sourced on Github and accepts contributions from any community member. If you ever wanted to see some templates of your own choice in the dialog boxed of Visual Studio, but were not sure of how to do it (like myself), now SideWaffle provides you a way to create the template very easily and also share it with all the developers around the globe.

A glance at some of the templates and snippets

SideWaffle already includes a bunch of useful templates and snippets. Following are some of the item templates available. As you see, we have a set of handy templates available to create just what we used to from scratch using the default language-based templates in Visual Studio.


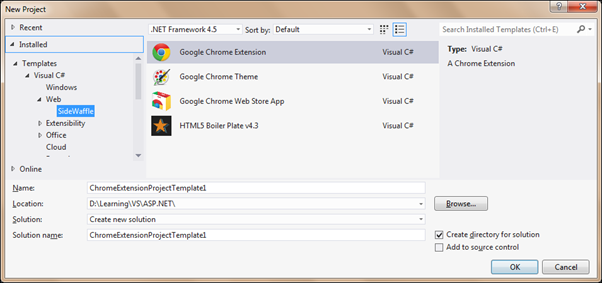
You can also create non-.NET projects like Chrome extension using a project template made available with SideWaffle.


My contribution

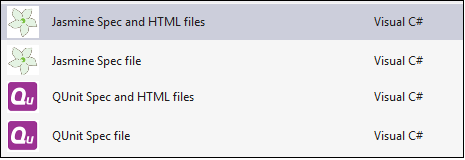
Over the past few days, I have been unit testing some Angular JS code. Creating the test spec files from scratch every time was not something I enjoyed. So, I wanted to see templates in the Add -> New Item dialog box of Visual Studio that creates a basic test skeleton on top of which I can write my tests. In the past, I have used Jasmine and QUnit for unit testing JavaScript code. So, I thought of contributing the templates to SiddeWaffle as testing JavaScript is becoming very popular these days. I forked the SideWaffle project on Github and my job of writing templates became easy with help of the video tutorial put up by Sayed on Youtube. I created the following four templates:

1. Jasmine Spec and HTML files: Adds a sample Jasmine spec file and the Jasmine HTML runner file 2. Jasmine Spec file: Adds a sample Jasmine spec file 3. QUnit Spec and HTML files: Adds a sample QUnit spec file and the QUnit HTML runner file 4. QUnit Spec file: Adds a sample QUnit spec file

I sent a pull request with the above templates and my changes were merged into the project. Now, I can’t wait to see my own templates under the SideWaffle tab:


You can do it too!

I have put together this blog post to let you know people like you and I can create our own template and share it with the entire community. Creating own item template in Visual Studio is painful, but SideWaffle’s build system makes this process very easy. Have a template that you want to share with everyone? Put it here!

Tuesday 7 January 2014

Using Dependency Injection with ASP.NET Web API Hosted on Katana

Using Katana we can build a light-weight server to host an ASP.NET application, without needing IIS or System.Web. Katana has a nice support for hosting SignalR and Web API with very few lines of code. In a previous post, we saw how to self-host SignalR using Katana. In this post, we will see how easy it is to perform dependency injection on a self-hosted Katana application.

Open Visual Studio 2013 and create a new console application. Add following NuGet packages to the application:


  • Install-Package Microsoft.AspNet.WebApi.Owin
  • Install-Package Ninject


First package gets a bunch of packages for creating and hosting Web API. The second package installs the Ninject IoC container.

Add an API Controller to the application and change the code of the controller to:

public class ProductsController : ApiController
{
    IProductsRepository repository;

    public ProductsController(IProductsRepository _repository)
    {
        repository = _repository;
    }

    public IEnumerable<Product> Get() 
    {
        return repository.GetAllProducts();
    }
}

We need to inject instance of a concrete implementation of IProductRepository. We will do this using dependency injection. You can create the repository interface and an implementation class by your own.

To perform dependency injection with Web API, the WebApiContrib project has a set of NuGet packages, including one for Ninject. But the version of Web API it requires is 4.0.30319. As we are using VS 2013, the default version of Web API is 5.0.0.0. Installing this NuGet package may result into version compatibility issues. To avoid this issue, we can build the WebapiContrib.Ioc.Ninject project using VS 2013 or we can also copy the code of NinjectResolver class from the GitHub repo and add it to the console application.

In the Owin Startup class, we need to configure Web API and also tie it with an instance of NinjectResolver. Constructor of NinjectResolver accepts an argument of IKernel type. Kernel is the object where we define the mapping between requested types and types to be returned. Let’s create a class with a static method; this method will create the kernel for us. Add a class and name it NinjectConfig. Change code of the class as:

public static class NinjectConfig
{
    public static IKernel CreateKernel()
    {
        var kernel = new StandardKernel();

        try
        {
            kernel.Bind<IProductsRepository>().To<ProductRepository>();
            return kernel;
        }
        catch (Exception)
        {
            throw;
        }
    }
}

Now all we need to do is, configure Web API and start the server. Add a class, change the name as Startup and replace the code as:
public class Startup
{
    public void Configuration(IAppBuilder app)
    {
        var config = new HttpConfiguration();
        config.DependencyResolver = new NinjectResolver(NinjectConfig.CreateKernel());

        config.Routes.MapHttpRoute("default", "api/{controller}/{id}", new { id=RouteParameter.Optional });

        app.UseWebApi(config);
    }
}


Finally, start the server in Main method:
static void Main(string[] args)
{
    string uri = "http://localhost:8080/";

    using (WebApp.Start<Startup>(uri))
    {
        Console.WriteLine("Server started...");
        Console.ReadKey();
        Console.WriteLine("Server stopped!");
    }
}


Open a browser and enter the following URL:


http://localhost:8080/api/products


You should be able to see list of products returned from the repository class.

Happy coding!